Setting up a fresh Windows workstation or recovering an isolated standalone server often leaves you in a difficult spot: you have zero physical or console access to the computer. You cannot plug in a keyboard, there is no crash cart monitor attached, and no remote KVM/iLO/iDRAC console is available. All you have is the machine’s static IP address on the network and the local administrator account credentials.
Yet when you attempt standard troubleshooting, Test-Connection fails with packet timeouts, Remote Desktop reports error code 0x204, and Enter-PSSession throws a WinRM connection refused error.
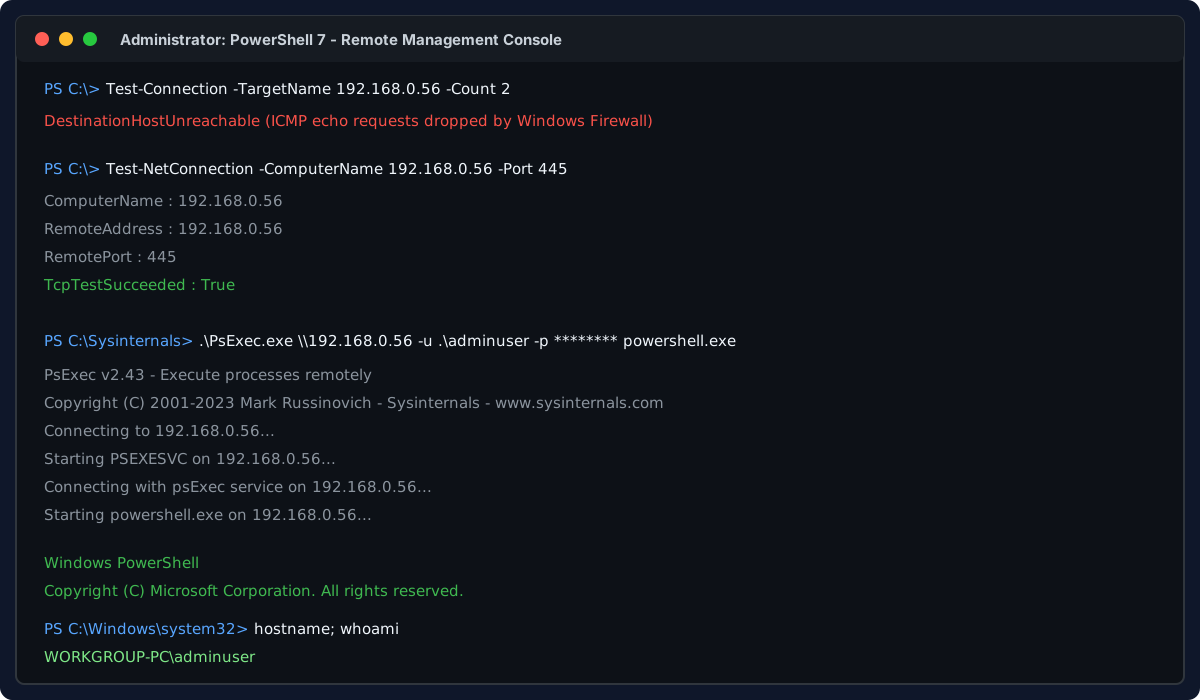
An unpingable non-domain Windows machine can still accept administrative commands over SMB (TCP 445) using Sysinternals PsExec.
Because the machine is not joined to an Active Directory domain, there is no Kerberos ticket granting service, no domain group policy pushing firewall exemptions, and no centralized DNS registration. Windows defaults to a locked-down profile where ICMP echo requests (ping) are discarded, WinRM listeners do not exist, and remote desktop services are disabled. Under the strict constraint of having no console or physical access, your only path is network-level bootstrapping: if TCP port 445 is reachable across the wire, you can use Sysinternals PsExec with your local administrator credentials to spawn a remote execution shell and configure Remote Desktop, WinRM, and OpenSSH in place.
The gist
When you have zero physical console access to an unpingable non-domain Windows computer, test whether SMB is reachable using Test-NetConnection -ComputerName <IP> -Port 445. If TCP 445 succeeds, use your local administrator credentials to launch an elevated remote execution shell over Sysinternals PsExec: .\PsExec.exe \\<IP> -u .\<AdminUser> -p <Password> -h -s powershell.exe. Once connected through this network bridgehead, enable RDP with the registry command shown in Stage 3, configure WinRM using Enable-PSRemoting -Force -SkipNetworkProfileCheck, and install OpenSSH via Add-WindowsCapability -Online -Name OpenSSH.Server~~~~0.0.1.0; Start-Service sshd; Set-Service -Name sshd -StartupType Automatic. Finally, open Windows Firewall for ports 3389, 5985, and 22.
The Non-Domain Admin Problem: Silent IP and No Access
In enterprise environments, Active Directory coordinates trust, mutual authentication, and firewall profiles automatically. When a computer is in a workgroup or deployed as an isolated node in a DMZ, Windows treats inbound connections with suspicion:
- Firewall Drop Rules: The Public or Private network profile defaults to blocking incoming ICMPv4 and ICMPv6 echo requests. A silent ping response does not mean the system is offline; it simply means the Windows Defender Firewall rule
File and Printer Sharing (Echo Request - ICMPv4-In)is disabled. - Missing Inbound Listeners: Neither Remote Desktop (
TermService) nor Windows Remote Management (WinRM) listen on their respective TCP ports (3389 and 5985) by default on clean Windows client installations (Windows 10 and Windows 11). - Local Account Token Filter Restrictions: Windows Vista introduced User Account Control (UAC) token stripping for local administrative accounts over the network. When connecting across network boundaries with a non-domain local account, Windows strips the administrative token and assigns standard user privileges, denying access to administrative shares (
ADMIN$,C$) and WMI unless a specific registry flag is set or the built-in localAdministratoraccount is used.
Operational Constraints and Access Boundaries
This guide assumes strict operational reality:
- Zero Console / Physical Access: No keyboard, mouse, monitor, VM hypervisor console access, or hardware out-of-band management (IPMI, iLO, iDRAC) is available. All remediation must occur strictly across the network adapter.
- Known IP Address: The target machine is running at a known, reachable IPv4 address (e.g.,
192.168.0.56). - Known Local Administrator Credentials: You possess the username and password for an account in the target’s local
Administratorsgroup. - Non-Domain Host (Workgroup): The machine is not joined to Active Directory; Kerberos cannot be used, and group policies cannot push administrative scripts.
- PsExec as the Bridgehead: Because SMB (TCP 445) is commonly accessible for remote service management even when ICMP and high-level remoting ports are blocked, Sysinternals PsExec serves as the bootstrap tool to gain the initial shell.
If your network routing permits traffic to the host subnet and SMB has not been blocked by an intermediate hardware firewall, the Windows Service Control Manager (SCM) on TCP 445 provides our backdoor to bootstrap everything else.
Why Ping Fails While Administration Is Still Possible
Network engineers often treat ping as an authoritative test for system health. On modern Windows installations, ICMP is decoupled from TCP socket listeners. Windows Defender Firewall maintains three distinct network profiles: Domain, Private, and Public.
When a computer is not domain-joined, its network interface typically defaults to Public unless an administrator explicitly marks the network as Private. On the Public profile:
- All unsolicited inbound ICMP echo packets are discarded without sending a rejection notice (stealth mode).
- Port 445 (SMB) may be allowed on local subnets if File and Printer Sharing was prompted, or it may remain open to local administrative endpoints depending on OEM imaging.
- Inbound connection attempts to TCP ports 3389 (RDP) and 5985 (WinRM) are blocked at the kernel network stack before any application socket can respond.
Before assuming a hardware fault or bad cabling, test the transport layer directly with PowerShell.
Prerequisites and Local Account Token Filter Policy
To follow this walkthrough, ensure you meet the following baseline requirements:
- Target Operating System: Windows 10, Windows 11, Windows Server 2016, 2019, 2022, or 2025.
- Credentials: A known local administrator account and password. Using the built-in account named
Administratorbypasses Remote UAC restrictions. If using a secondary local admin account (e.g.,localadmin), the remote host may requireLocalAccountTokenFilterPolicyset to1. - Administrative Machine: Windows PowerShell 5.1 or PowerShell 7+ running as Administrator on your workstation.
- Sysinternals Suite: Download Sysinternals PsExec from Microsoft and extract
PsExec.exeto a local folder (such asC:\Tools\Sysinternals).
If the target has an active local admin account other than the primary built-in Administrator, Windows drops administrative privileges during network authentication. You can pre-emptively disable this remote token filtering over PsExec by passing the -s flag, which forces execution under the target’s local NT AUTHORITY\SYSTEM context.
Stage 1: Verify SMB Port 445 Connectivity
Do not rely on ping.exe. Open an elevated PowerShell terminal on your management PC and run Test-NetConnection:
$targetIP = "192.168.0.56"

# Check raw ICMP response
Test-Connection -TargetName $targetIP -Count 2

# Check TCP port 445 (SMB transport)
Test-NetConnection -ComputerName $targetIP -Port 445
If the output displays:
TcpTestSucceeded : TrueIf TcpTestSucceeded returns False, do not proceed to Stage 2 yet. PsExec requires an active SMB listener on port 445 to deploy its execution service.
Troubleshooting Port 445 Connection Failure
When testing the remote target IP (for example, 192.168.0.56), Test-NetConnection may return a failed TCP handshake alongside a ping timeout:
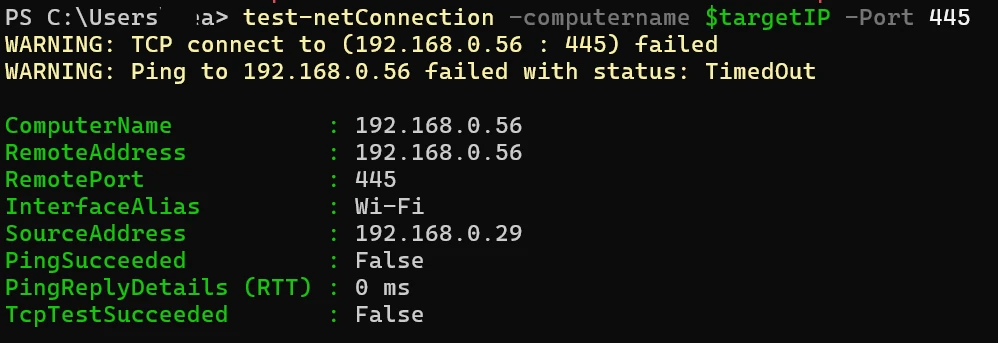
The connection test fails with TcpTestSucceeded: False and PingSucceeded: False over the local Wi-Fi interface.
The output reveals three specific conditions:
- Interface: The management workstation connects over the
Wi-Fiadapter (InterfaceAlias : Wi-Fi,SourceAddress : 192.168.0.29). - Ping Failure:
Ping to 192.168.0.56 failed with status: TimedOut. - Port Failure:
TCP connect to (192.168.0.56 : 445) failed(TcpTestSucceeded : False).
Because PsExec requires SMB on port 445 to communicate with the Service Control Manager, you cannot advance to Stage 2 until TCP 445 succeeds.
Why Port 445 Fails on the Local Subnet
When both devices reside on the same IP subnet (such as 192.168.0.0/24), four common issues block port 445:
- Wi-Fi Client Isolation (AP Isolation): The source interface is
Wi-Fi. Consumer Wi-Fi routers and access points (Netgear, ASUS, TP-Link, Eero) frequently enable AP Isolation or Client Isolation by default, especially on guest networks or 5 GHz bands. This feature isolates wireless clients, permitting internet access but dropping all layer-2 and layer-3 peer-to-peer traffic between local devices. - Public Network Profile on the Target: A fresh or non-domain Windows installation classifies newly joined Wi-Fi networks as Public unless an administrator designates them as Private. On the Public firewall profile, Windows Defender Firewall drops all unsolicited inbound SMB packets (TCP 445) and ICMP echo requests (Ping) without responding.
- Target Device Sleeping or Suspended: Windows laptops and workstations on Wi-Fi aggressively enter Modern Standby or Sleep. When suspended, the Wi-Fi card powers down the TCP listener stack.
- Third-Party Security Suites: Endpoint protection software (Norton, McAfee, Bitdefender) often blocks incoming file sharing ports on non-domain networks regardless of native Windows Firewall rules.
Step 1: Check Layer 2 ARP Resolution
First, determine whether traffic is reaching the target physical hardware or dropping on the network switch. Run Get-NetNeighbor on your management machine:
Get-NetNeighbor -IPAddress "192.168.0.56" | Select-Object IPAddress, LinkLayerAddress, StateIn real troubleshooting scenarios, Get-NetNeighbor often returns a valid MAC address with a Stale state:

Get-NetNeighbor returns a valid MAC address (34-5A-60-4A-CD-88) but marks the entry as Stale.
Understanding the Stale State in Windows TCP/IP
The Windows Neighbor Discovery / ARP cache (RFC 4861) classifies link-layer entries into distinct lifecycle states:
Reachable: Positive bidirectional communication occurred recently (within the last 30 seconds). The target is confirmed online and listening at layer 2.Stale: The target MAC address (34-5A-60-4A-CD-88) was previously learned and cached, confirming this machine was active on the subnet. However, the reachability timer expired without any recent unsolicited packets. When you attemptedTest-NetConnection -Port 445andPing, Windows sent packets directly to this MAC address, but received no response or acknowledgment.Unreachable: Active unicast ARP probes were transmitted, but the target completely failed to respond.
A Stale state paired with TcpTestSucceeded: False points to three practical realities:
- Target in Modern Standby / Sleep: The workstation was on earlier, but suspended after a few minutes of inactivity. When Windows sleeps, the Wi-Fi card powers down the TCP listener stack while the management PC retains the MAC address.
- Wi-Fi Power Management Disconnect: Many wireless network cards power down the radio after idle timeouts, dropping off the wireless access point.
- Target IP Reassigned: If the DHCP lease expired, the machine may have dropped or acquired a different IP address, leaving behind a ghost ARP record.
How to Force ARP Refresh or Wake the Machine
Because Get-NetNeighbor revealed the exact physical MAC address (34-5A-60-4A-CD-88), you can take two immediate remediation actions:
1. Send a Wake-on-LAN Magic Packet: Wake the target from Modern Standby or sleep across the local subnet using PowerShell:
$mac = "34-5A-60-4A-CD-88"
$macBytes = $mac -split '[:-]' | ForEach-Object { [byte]("0x$_") }
$packet = [byte[]](@(0xFF) * 6 + ($macBytes * 16))
$udp = [System.Net.Sockets.UdpClient]::new()
$udp.Connect([System.Net.IPAddress]::Broadcast, 9)
$udp.Send($packet, $packet.Length)
$udp.Close()
Write-Host "Wake-on-LAN magic packet sent to $mac" -ForegroundColor Green
2. Flush the Stale Neighbor Cache and Retest: Force Windows to clear the cached entry and send fresh ARP requests:
# Remove the stale cache entry
Remove-NetNeighbor -IPAddress "192.168.0.56" -Confirm:$false -ErrorAction SilentlyContinue

# Trigger a fresh probe
Test-Connection -TargetName "192.168.0.56" -Count 1

# Check if the state transitions to Reachable or Unreachable
Get-NetNeighbor -IPAddress "192.168.0.56" | Select-Object IPAddress, LinkLayerAddress, State
If the entry transitions to Reachable, the host is awake and communicating at layer 2. If it transitions to Unreachable, the machine is powered off, on a different Wi-Fi network, or isolated by the router.
Step 2: Eliminate Wi-Fi Client Isolation
Because Wi-Fi isolation is the leading cause of communication dropouts between wireless machines on 192.168.0.x:
- Log in to your Wi-Fi Router: Open
http://192.168.0.1in your browser. Under Wireless or Advanced Settings, look for AP Isolation, Client Isolation, or Station Separation, and disable it. - Use a Wired Connection: Connect both the management PC and the target computer to the router or an unmanaged switch using Ethernet cables. Ethernet interfaces are not subject to wireless AP isolation.
- Direct Ethernet Patch Cable: If no switch is nearby, plug a single Ethernet patch cable directly between both machines. Modern network cards feature auto-MDI/MDI-X and will self-negotiate a link. Assign static IPs (or rely on APIPA
169.254.x.x) to test port 445 directly without any router intervention.
Step 3: Wake the Target Host
If the machine is asleep, wake the system by sending a Wake-on-LAN magic packet or pressing a key on the physical device:
# Verify the target lease is still active in your router DHCP client table
Test-NetConnection -ComputerName "192.168.0.56" -InformationLevel Detailed
Step 4: Configure the Target Firewall and Network Profile
If you have physical access, a temporary keyboard session, or a one-time provisioning script (such as an unattended USB drive or scheduled setup task), run the following commands on the target machine in an elevated PowerShell prompt:
# 1. Change the active network connection profile to Private
Get-NetConnectionProfile | Set-NetConnectionProfile -NetworkCategory Private

# 2. Enable Windows Firewall rules for File and Printer Sharing (SMB 445)
Enable-NetFirewallRule -DisplayGroup "File and Printer Sharing"

# 3. Allow ICMP Echo Requests (Ping) for diagnostic visibility
Enable-NetFirewallRule -DisplayName "File and Printer Sharing (Echo Request - ICMPv4-In)"
Step 5: Retest Port 445 Before Proceeding
Once the network profile is set to Private, AP isolation is resolved, or the target is wired directly, rerun the verification test:
Test-NetConnection -ComputerName "192.168.0.56" -Port 445When TcpTestSucceeded returns True, SMB communication is open. You can now safely proceed to Stage 2 to launch PsExec.
Alternative Ways to Pass Through If Port 445 Stays Blocked
If TCP port 445 remains stubbornly unreachable despite network troubleshooting, do not give up. Windows administration provides several alternate entry pathways depending on which services were pre-installed or left enabled:
1. Perform a Full Management Port Sweep
Do not assume every administrative port is down. Test common remote management ports in one quick scan:
$targetIP = "192.168.0.56"
$ports = @(22, 135, 139, 445, 3389, 5985, 5986)

$ports | ForEach-Object {
    $res = Test-NetConnection -ComputerName $targetIP -Port $_ -WarningAction SilentlyContinue
    [PSCustomObject]@{
        Port    = $_
        Service = switch ($_) {
            22   { "OpenSSH" }
            135  { "RPC / WMI / DCOM" }
            139  { "NetBIOS Session" }
            445  { "SMB / PsExec" }
            3389 { "Remote Desktop (RDP)" }
            5985 { "WinRM (HTTP)" }
            5986 { "WinRM (HTTPS)" }
        }
        IsOpen  = $res.TcpTestSucceeded
    }
} | Format-Table -AutoSize
When every management port returns False, the scan output looks like this:
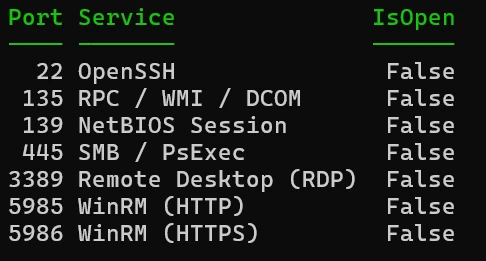
All standard Windows remote management ports return IsOpen: False on target 192.168.0.56.
What All Ports False Actually Means
When every port (including baseline RPC port 135 and SMB port 445) returns False, combined with the Stale ARP state and TimedOut ping:
- The Host Is Not Reachable on the Wire: This is not a simple service configuration issue (such as “RDP is turned off”). In Windows, if the machine were awake and only dropping high-level management, low-level RPC port 135 or dynamic port behavior would differ, and ARP state would be
Reachable. - Modern Standby or Sleep: On Wi-Fi connections, Windows laptops and desktops power down their Wi-Fi card’s packet reception within minutes of idle time. The machine stops responding to TCP SYN packets and ICMP echo requests entirely.
- Wi-Fi AP Isolation: The wireless router is actively dropping all layer-2 and layer-3 packets between Wi-Fi clients. Your management laptop sends TCP packets, but the router drops them at the access point before they reach the target.
- IP Address Shift: The target computer reconnected to Wi-Fi and the router assigned it a different IP address, leaving
192.168.0.56as an abandoned lease.
How to Go Forward When All Network Ports Are Closed
If every network port is closed and no services respond, you have reached the limits of purely in-band TCP network remoting. To break through without console access, use one of these physical, router-level, or layer-2 bypass strategies:
Strategy 1: Trigger Wake-on-LAN Directly from the Router
Wi-Fi routers often drop broadcast WoL packets sent between wireless clients due to wireless multicast filtering. However, the router itself has a direct layer-2 connection to all connected stations:
- Log in to your router gateway admin portal (
http://192.168.0.1). - Navigate to Network Tools or Wake on LAN.
- Enter the physical MAC address discovered in Step 1:
34-5A-60-4A-CD-88. - Trigger the wake command from the router. This transmits the magic packet directly from the router’s AP radio to the sleeping Wi-Fi interface.
Strategy 2: Check the Router DHCP Client Table for IP Shifts
In the router web interface under Connected Devices or DHCP Client List:
- Locate the entry with MAC
34-5A-60-4A-CD-88. - Check the current assigned IP address. If the target rebooted and acquired
192.168.0.75, run your port sweep against the new IP. - Check the connection state: if the router lists the client as “Offline”, the machine is either shut down, battery depleted, or its Wi-Fi radio is suspended.
Strategy 3: Subnet Sweep for Active Windows Hosts
If you do not have router admin access, run an asynchronous ping sweep across the subnet to locate any newly assigned IPs:
1..254 | ForEach-Object -Parallel {
    $ip = "192.168.0.$_"
    if (Test-Connection -TargetName $ip -Count 1 -Quiet -TimeoutSeconds 1) {
        $neighbor = Get-NetNeighbor -IPAddress $ip -ErrorAction SilentlyContinue
        [PSCustomObject]@{
            IPAddress = $ip
            MAC       = $neighbor.LinkLayerAddress
        }
    }
} -ThrottleLimit 50 | Where-Object { $_.MAC } | Format-Table -AutoSize
Look for the MAC address 34-5A-60-4A-CD-88 in the results to identify if the host moved to a different IP.
Strategy 4: Direct Ethernet Cable Bridge (Bypassing Wi-Fi Isolation and Sleep)
Connecting an Ethernet cable directly between your management PC and the target computer creates an isolated hardware bridge:
- Connect an Ethernet patch cable between your laptop and the target computer.
- Even if the target is in Modern Standby, connecting a physical Ethernet cable triggers a hardware carrier detection (
link-upinterrupt), which immediately wakes the system or its network stack. - A direct wired cable completely eliminates router-level Wi-Fi AP Isolation and firewall subnet filtering.
- Windows will auto-assign an APIPA address (
169.254.x.x) on both ends. You can scan169.254.x.xor assign a static IP to reach port 445 directly.
Strategy 5: USB Provisioning
A USB drive does not automatically run PowerShell or batch files when inserted. Use this method when someone can sign in and launch the script, or when a separate, authorized deployment process will run it. The script must run elevated, and the target must be a Windows edition that can host Remote Desktop (Windows Pro, Enterprise, Education, or Windows Server; Windows Home cannot accept incoming RDP connections).
- Format a USB flash drive and save the following as
enable-remote.ps1on its root:#Requires -RunAsAdministrator Get-NetConnectionProfile | Set-NetConnectionProfile -NetworkCategory Private Enable-NetFirewallRule -DisplayGroup "File and Printer Sharing" Enable-NetFirewallRule -DisplayGroup "Remote Desktop" $firewallRules = @( @{ Name = "USB-Provision-SMB-TCP-445" DisplayName = "USB Provisioning - SMB (TCP 445)" Protocol = "TCP" LocalPort = 445 }, @{ Name = "USB-Provision-RDP-TCP-3389" DisplayName = "USB Provisioning - Remote Desktop (TCP 3389)" Protocol = "TCP" LocalPort = 3389 }, @{ Name = "USB-Provision-ICMPv4-Echo" DisplayName = "USB Provisioning - ICMPv4 Echo Request" Protocol = "ICMPv4" IcmpType = 8 } ) foreach ($rule in $firewallRules) { if (Get-NetFirewallRule -Name $rule.Name -ErrorAction SilentlyContinue) { Set-NetFirewallRule -Name $rule.Name -Enabled True -Profile Any -Action Allow } else { New-NetFirewallRule @rule -Direction Inbound -Action Allow -Profile Any } } $rdpKey = "HKLM:\System\CurrentControlSet\Control\Terminal Server" Set-ItemProperty -Path $rdpKey -Name "fDenyTSConnections" -Value 0 Set-Service -Name "TermService" -StartupType Automatic Start-Service -Name "TermService" - On the target, open PowerShell as Administrator and run the script from the USB drive, for example:
Replace
& "E:\enable-remote.ps1"E:with the USB drive letter. The explicit rules allow inbound SMB over TCP 445, RDP over TCP 3389, and ICMPv4 echo requests (ping). The script can be run again without adding duplicate rules. - If no interactive administrator session is available, use an authorized management or provisioning mechanism. A USB drive by itself cannot bypass Windows sign-in or elevation requirements. A Windows Provisioning Package (
.ppkg) created with Windows Configuration Designer is a separate deployment option and must be applied through a supported provisioning flow.
Strategy 6: Alternative Entry via WMI and DCOM (TCP 135)
If port 135 later opens up after waking the device, you can bypass PsExec completely and spawn processes via WMI over DCOM:
$cred = Get-Credential  # Enter .\adminuser and password
$opt = New-CimSessionOption -Protocol Dcom
$session = New-CimSession -ComputerName "192.168.0.56" `
    -Credential $cred -SessionOption $opt

# Build the remote command as a readable multi-line string
$cmd = @"
Set-NetConnectionProfile -NetworkCategory Private;
Enable-NetFirewallRule -DisplayGroup 'File and Printer Sharing';
Set-ItemProperty -Path 'HKLM:\System\CurrentControlSet\Control\Terminal Server' `
    -Name 'fDenyTSConnections' -Value 0
"@

# Execute command to open firewall and enable RDP
Invoke-CimMethod -CimSession $session `
    -ClassName Win32_Process `
    -MethodName Create `
    -Arguments @{
        CommandLine = "powershell.exe -ExecutionPolicy Bypass -Command `"$cmd`""
    }
Strategy 7: Alternative Entry via WinRM (TCP 5985)
If WinRM responds, connect immediately:
Set-Item WSMan:\localhost\Client\TrustedHosts -Value "192.168.0.56" -Concatenate -Force
Enter-PSSession -ComputerName "192.168.0.56" -Credential (Get-Credential)
Stage 2: Bootstrap Access with Sysinternals PsExec
Sysinternals PsExec operates by communicating with the target machine’s Service Control Manager over the IPC$ and ADMIN$ SMB shares. It temporarily deploys a lightweight Windows service called PSEXESVC.exe, starts it, executes your requested command under the specified security token, and redirects standard input/output back over named pipes to your console.
Open an elevated PowerShell prompt in your Sysinternals directory and invoke PsExec.exe:
$targetIP = "192.168.0.56"
$localAdmin = "adminuser"
$password   = "P@ssw0rd2026!"

# Connect and spawn an interactive remote PowerShell prompt
.\PsExec.exe \\$targetIP -u .\$localAdmin -p $password -h -s powershell.exe
Parameter Breakdown
\\$targetIP: Specifies the remote IPv4 address.-u .\$localAdmin: The.\prefix forces Windows to evaluate the credential against the target machine’s local Security Accounts Manager (SAM) database rather than attempting domain authentication.-p $password: Supplies the local administrator password.-h: Launches the remote process with the elevated administrative token if UAC is enabled.-s: Runs the command in the target machine’sNT AUTHORITY\SYSTEMcontext, completely circumventing Remote UAC token stripping.powershell.exe: The interactive process to execute on the remote host.
When successful, your console prompt changes to PS C:\Windows\system32>. You are now running PowerShell inside the target machine. Confirm your environment:
hostname
whoami
Get-NetIPAddress -AddressFamily IPv4 | Format-Table InterfaceAlias, IPAddress
Keep this PsExec terminal open. You will execute Stages 3, 4, and 5 directly within this remote shell.
Stage 3: Enable Remote Desktop (RDP)
With remote command execution established, configure Remote Desktop Protocol (RDP) to enable full graphical access.
1. Enable RDP in the Registry
RDP is controlled by the fDenyTSConnections DWORD under the Terminal Server registry key. Setting it to 0 enables the service:
Set-ItemProperty `
    -Path 'HKLM:\System\CurrentControlSet\Control\Terminal Server' `
    -Name 'fDenyTSConnections' `
    -Value 0
2. Configure Network Level Authentication (NLA)
Network Level Authentication requires connecting clients to authenticate before a full session is negotiated. On non-domain computers, NLA can occasionally cause credential handshake mismatches. For maximum initial accessibility, set UserAuthentication to 0 (or 1 if your corporate security policy strictly mandates NLA):
# 0 = NLA Optional/Disabled for initial non-domain recovery
# 1 = NLA Required
Set-ItemProperty `
    -Path 'HKLM:\System\CurrentControlSet\Control\Terminal Server\WinStations\RDP-Tcp' `
    -Name 'UserAuthentication' `
    -Value 0
3. Open Firewall Rules for Port 3389
Ensure Windows Defender Firewall allows incoming connections on port 3389 across all active network profiles:
Enable-NetFirewallRule -DisplayGroup "Remote Desktop"
Set-NetFirewallRule -Name "RemoteDesktop-UserMode-In-TCP" -Enabled True -Profile Any
4. Ensure the Terminal Service Is Running
Start the Remote Desktop service (TermService) and configure it to run automatically on system boot:
Set-Service -Name "TermService" -StartupType Automatic
Start-Service -Name "TermService"
Stage 4: Configure WinRM and PowerShell Remoting
Windows Remote Management (WinRM) enables programmatic command execution via Enter-PSSession, Invoke-Command, and modern management modules without the overhead of an interactive GUI desktop.
Run the following commands inside your remote PsExec console:
1. Configure WinRM Service and Firewall
The Enable-PSRemoting cmdlet automates the creation of HTTP listeners on port 5985, creates the necessary local firewall rules, and starts the service:
Enable-PSRemoting -Force -SkipNetworkProfileCheck[!NOTE] The
-SkipNetworkProfileCheckflag is mandatory on non-domain computers. Without it,Enable-PSRemotingfails if any network interface is categorized under the Public profile.
2. Enable Basic and Negotiate Authentication
Because Kerberos is unavailable without an Active Directory Domain Controller, the WinRM service on the target machine must accept local authentication over NTLM/Negotiate:
Set-Item -Path WSMan:\localhost\Service\Auth\Negotiate -Value $true
Set-Item -Path WSMan:\localhost\Service\AllowUnencrypted -Value $true
Set-Item -Path WSMan:\localhost\Service\Auth\Basic -Value $true
3. Verify the Listener
Confirm the listener is active on TCP port 5985:
Get-ChildItem WSMan:\localhost\ListenerYou should see a listener with Transport = HTTP bound to port 5985 listening on IP: *.
Stage 5: Install and Start OpenSSH Server
Modern Windows 10, 11, and Windows Server distributions ship with a native Microsoft port of OpenSSH. Enabling SSH provides cross-platform terminal access, robust public key authentication, and resistance to standard Windows NTLM authentication quirks.
Execute the following in your remote shell:
1. Install OpenSSH Server Feature
Query and install the OpenSSH Server capability using DISM/PowerShell:
# Check if capability is present
Get-WindowsCapability -Online | Where-Object Name -like 'OpenSSH.Server*'

# Install the OpenSSH Server capability
Add-WindowsCapability -Online -Name OpenSSH.Server~~~~0.0.1.0
2. Configure Service Startup and Start the Daemon
The OpenSSH server binary is registered as sshd:
Start-Service sshd
Set-Service -Name sshd -StartupType Automatic
3. Open Inbound Port 22 in Firewall
Windows automatically registers an inbound rule during capability installation, but you should verify it explicitly:
if (-not (Get-NetFirewallRule -Name "OpenSSH-Server-In-TCP" -ErrorAction SilentlyContinue)) {
    New-NetFirewallRule -Name "OpenSSH-Server-In-TCP" -DisplayName "OpenSSH SSH Server (sshd)" `
        -Enabled True -Direction Inbound -Protocol TCP -Action Allow -LocalPort 22 -Profile Any
} else {
    Set-NetFirewallRule -Name "OpenSSH-Server-In-TCP" -Enabled True -Profile Any
}
4. Enable ICMP Echo Requests (Optional Ping Repair)
If you also want the machine to answer standard network ping diagnostics in the future, unblock ICMP echo requests:
netsh advfirewall firewall add rule name="Allow ICMPv4-In" protocol=icmpv4:8,any dir=in action=allowAt this point, all three remote management protocols are installed, listening, and allowed through the host firewall. You can now exit the PsExec session by typing exit.
Stage 6: Client Configuration for Workgroup Authentication
Before your management PC can connect to the target over WinRM, you must configure your local client. In a workgroup environment, Windows will not authenticate to an IP address over WinRM because it cannot mutually authenticate the host with Kerberos.
Run the following commands on your local management workstation in an elevated PowerShell session:
1. Add the Target IP to TrustedHosts
The TrustedHosts list informs your local WinRM client that it is safe to transmit credentials to the specified IP address without Kerberos verification:
$targetIP = "192.168.0.56"

# View current TrustedHosts
Get-Item WSMan:\localhost\Client\TrustedHosts

# Append the target IP (or use * in isolated lab environments)
Set-Item WSMan:\localhost\Client\TrustedHosts -Value $targetIP -Concatenate -Force
2. Allow Unencrypted Client Connections for Local Subnets
If you have not provisioned an HTTPS certificate on port 5986, permit unencrypted HTTP transport on your client:
Set-Item WSMan:\localhost\Client\AllowUnencrypted -Value $trueStage 7: Verification and Troubleshooting
With both target and client configured, verify all three administrative protocols from your local management workstation.
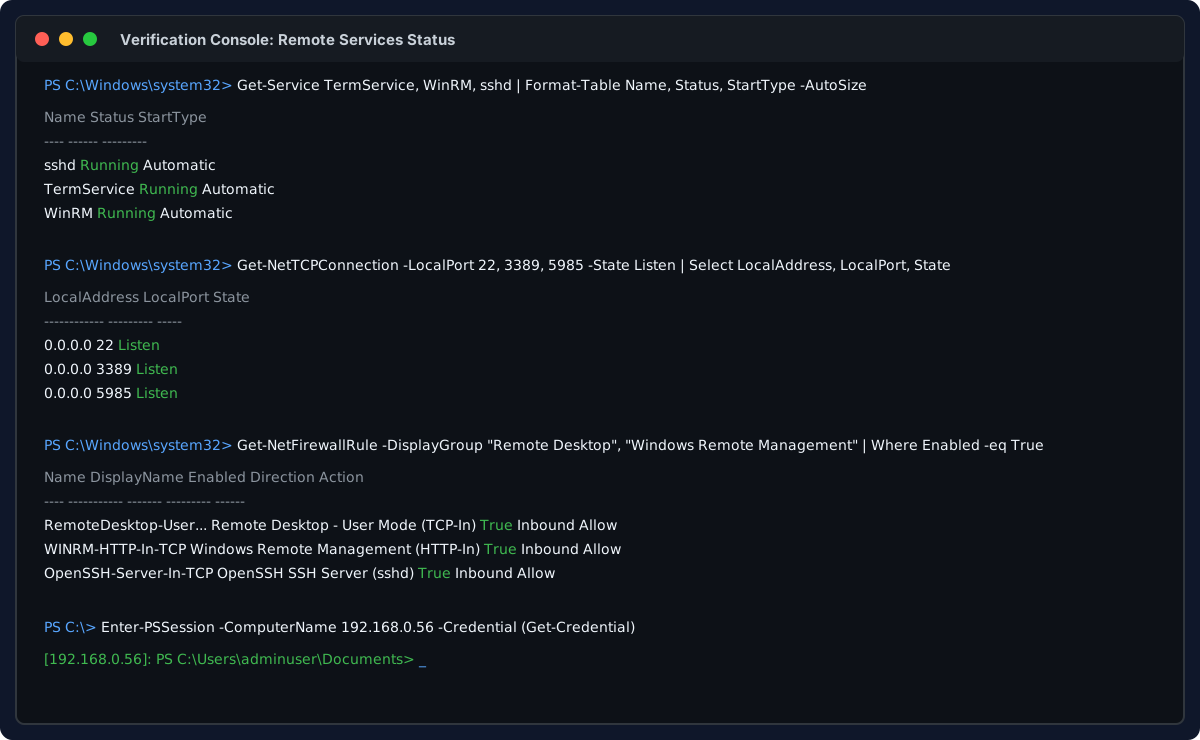
Validating active listeners, firewall allowances, and interactive remoting across SSH, WinRM, and RDP.
1. Test Network Ports from Client
$targetIP = "192.168.0.56"

$ports = @(22, 3389, 5985)
foreach ($p in $ports) {
    [PSCustomObject]@{
        Port    = $p
        Open    = (Test-NetConnection -ComputerName $targetIP -Port $p -WarningAction SilentlyContinue).TcpTestSucceeded
    }
}
All three ports should report Open: True.
2. Connect via WinRM (PowerShell Remoting)
$cred = Get-Credential  # Enter username formatted as .\adminuser and password
Enter-PSSession -ComputerName "192.168.0.56" -Credential $cred
Once inside, test running remote background commands across sessions:
Invoke-Command -ComputerName "192.168.0.56" -Credential $cred -ScriptBlock {
    Get-ComputerInfo | Select-Object WindowsProductName, WindowsVersion, TotalPhysicalMemory
}
3. Connect via OpenSSH
Open a terminal or PowerShell prompt:
ssh adminuser@192.168.0.56Accept the host key fingerprint and supply your local administrator password. You will receive an authentic Windows command shell.
4. Connect via Remote Desktop (RDP)
Launch the standard Windows Remote Desktop Connection utility:
mstsc.exe /v:192.168.0.56When prompted for credentials, click More choices -> Use a different account, and supply:
- Username:
.\adminuseror192.168.0.56\adminuser - Password: your local administrator password
Troubleshooting Common Edge Cases
| Symptom | Root Cause | Solution |
|---|---|---|
PsExec returns Access is Denied (error code 5) |
Remote UAC token stripping on secondary local admin | Connect using the built-in .\Administrator account, or run PsExec with the -s parameter to elevate directly to SYSTEM. |
Enter-PSSession throws WinRM cannot process the request... The client cannot connect to the destination |
Target IP address is not present in local TrustedHosts list |
Run Set-Item WSMan:\localhost\Client\TrustedHosts -Value <IP> -Concatenate -Force on your management computer. |
RDP reports An authentication error has occurred. The function requested is not supported |
CredSSP encryption oracle remediation mismatch | Align your client’s CredSSP policy via gpedit.msc or temporarily disable mandatory NLA by setting UserAuthentication to 0 in the target’s registry. |
| OpenSSH service stops immediately after starting | File permissions on C:\ProgramData\ssh\sshd_config or host keys are too permissive |
Run Fix-HostFilePermissions.ps1 located in C:\Program Files\OpenSSH\ or reset owner to SYSTEM. |
| Ping still times out after setup | ICMP echo request rule was only enabled for Private profile while interface is Public | Run Set-NetFirewallRule -Name "FPS-ICMP4-ERQ-In" -Profile Any -Enabled True to apply the rule across all profiles. |
Summary
Recovering management access to an unconfigured, non-domain Windows computer does not require local keyboard access if SMB port 445 is reachable. By leveraging Sysinternals PsExec to establish an initial bridgehead under the local SYSTEM account, you can quickly configure Remote Desktop for graphical troubleshooting, WinRM for PowerShell scripting and automation, and OpenSSH for cross-platform remote administration.
Once these services are secured and verified, you can perform full system maintenance, automate patch deployments, or complete a domain join workflow entirely across the network.
For related guides on remoting architecture and port validation, see PowerShell Remoting with WinRM and SSH and Test if a Network Port is Open.
💬 Comments